
Are You Still Making Basic AI Videos? How Higgsfield Cinema Studio 2.0 Builds Real Hollywood Movies
Higgsfield Cinema Studio 2.0 is the exact tool you need to stop making generic AI generations and start directing actual films. Most people just type a simple text prompt into an AI video generator. They ask for a cinematic shot of a mountain. Consequently, they receive a flat, boring video that looks like every other piece of AI content on the internet.
In fact, we have all experienced that frustration. You have a massive, epic vision in your head. You want a specific camera angle. You want the background to blur beautifully. You want the action to move in slow motion at the exact right moment. Unfortunately, basic AI tools simply ignore your directions. They act like rebellious camera operators who do whatever they want.
Writing a high quality prompt is no longer enough. Instead, you need absolute control over the virtual film set. Specifically, you need the ability to choose your camera sensor, your lens, your focal length, and your aperture.
This is exactly where the industry is shifting. Today, I am sharing my complete, hands-on experience with this platform. I have spent countless hours inside this virtual studio. I have submitted my own creations to their official contests. I have tested every single camera setup, from ultra wide action shots to intimate, blurry portraits.
Therefore, I am handing you my personal director’s playbook. This is not a basic overview. On the contrary, this is a deep dive into the exact settings I used to build two massive epic movies. I will show you how to build a blockbuster live action trailer. Additionally, I will show you how to maintain perfect character consistency for a 3D Pixar style animated film.
I designed this guide to take you from a casual prompt writer to a technical AI director. I have tested these specific Higgsfield Cinema Studio 2.0 settings against thousands of iterations. As a result, I know exactly what works for a commercial client and what fails.
Ready to step into the director’s chair? Let us build a masterpiece.
The Power of the Virtual Camera Department
A great movie dies without great cinematography. You might have a cool character design, but if the camera feels cheap, the entire video feels cheap. Higgsfield Cinema Studio 2.0 changes the entire landscape because it gives you a digital camera truck.
Unlike basic platforms, this tool forces you to think like a professional Director of Photography. It demands that you understand how a camera actually captures light.
Why this matters: It establishes the visual quality immediately. If you ask for a Grand Format 70mm film camera, it builds immense depth. If you ask for an 8mm focal length, it builds distortion and chaos. It gives you the technical foundation for your entire movie.
Choosing Your Camera Sensor
The camera sensor dictates the overall texture and resolution of your film. You have six highly distinct options to choose from.
Grand Format 70mm Film: This is the absolute highest quality option available. It provides that massive IMAX feel. It offers the richest dynamic range and the deepest cinematic look. I use this exclusively for epic movie trailers.
Modular 8K Digital: Think of this like a modern RED V Raptor camera. It is incredibly sharp. It is clean. It is perfect for modern commercials or high end tech advertisements where you need absolute clarity.
Full Frame Cine Digital: This mimics a high end Sony Venice camera. It is beautiful, balanced, and highly professional. It is the workhorse sensor for standard narrative storytelling.
Premium Large Format Digital: This provides a modern digital large format look. It feels similar to a Panavision DXL2. It is exceptionally clean and lacks the heavy grain of vintage film.
Studio Digital S35: This is your standard television and broadcast sensor. It is great for standard YouTube videos or casual content where you do not need an overly dramatic film aesthetic.
Classic 16mm Film: This is for the artists. It adds heavy grain, slight color shifts, and a nostalgic texture. It is the perfect choice for an indie film vibe, a memory sequence, or a historical documentary style.
Selecting the Perfect Lens
You judge a scene by its lighting, but you feel a scene because of the lens. The lens adds the character.
Compact Anamorphic & Classic Anamorphic: Anamorphic lenses provide that stretched cinematic look. They create a wide epic frame. They produce beautiful oval background blur and those signature horizontal lens flares. You see this look in major Hollywood movies like Dune or Interstellar.
Premium Modern Prime & Clinical Sharp Prime: These lenses are flawlessly clean. They have no distortion. They are perfect for highly detailed product shots or sharp 3D animations where you need every pixel to be perfect.
Vintage Prime & 70s Cinema Prime: These lenses add warmth, slight edge softness, and a beautiful retro character. They are excellent for period pieces or emotional, nostalgic storytelling.
Swirl Bokeh Portrait & Halation Diffusion: These are specialty lenses. The swirl bokeh creates a dizzying, dreamlike background. The halation diffusion makes lights glow softly. They are highly artistic and best used for intimate, romantic, or dream sequences.
Extreme Macro & Creative Tilt Lens: The macro lens gets you incredibly close to small details, like an insect or a water drop. The tilt lens blurs the top and bottom of the frame, making real life look like a miniature toy set.
Mastering Focal Length and Aperture
This is the most critical technical step. “Guessing” your focal length is a fast way to ruin a great prompt. Setting it correctly guarantees a professional result.
The Focal Lengths: The 8mm and 14mm options are ultra wide. They look like a GoPro. They are highly distorted and dramatic. They are excellent for intense action or showing a massive landscape, but they will distort a human face heavily. The 35mm option is slightly wider than normal. It is very common in movies. It is perfect for capturing conversations or medium shots where you want to see the environment. The 50mm option is the absolute winner for the Hollywood look. It looks natural, just like human vision. It creates a beautiful background blur. It makes actors look highly cinematic.
The Aperture Settings: The f/1.4 setting gives you a beautiful, soft background blur. The subject pops out immediately. It feels highly luxurious. Most big budget movies shoot with a wide aperture like this for dramatic scenes. The f/4 setting is balanced. It is used for daylight scenes where you want the subject in focus but still want to see some detail in the background. The f/11 setting keeps everything perfectly sharp. The background and the foreground are in focus. It looks flat. It is best for documentary styles or sweeping landscape shots where every detail matters.
Read this article: The 10 Best AI Video Tools of 2026 — Tested, Compared & Reviewed
Directing the Action: Ramps, Genres, and Shots
Now that your camera is built, we have to direct the motion. Higgsfield Cinema Studio 2.0 provides incredibly granular control over how the video actually plays out over time.
Speed Ramps
Motion is emotion. A flat, continuous speed can feel robotic. The speed ramp options allow you to change the pacing dynamically.
- Linear & Auto: These are your standard, smooth motions. The speed stays consistent from the first frame to the last.
- Slow Motion: This stretches the action. It makes a jumping character or an explosion feel massive and weighty.
- Speed Up: This accelerates the action, perfect for a fast paced montage or a chaotic time lapse.
- Impact & Custom: The Impact setting slows down right at the climax of the action. The Custom setting allows you to draw your own curve. For instance, you can start normal, suddenly freeze time, and then slowly resume the motion.
Directing the Genre
The Genre setting tells the AI engine what kind of “mood” to prioritize in the generation.
If you select Action or Spectacle, the engine favors dynamic camera movement, high contrast, and epic lighting. If you select Intimate or Suspense, the engine slows the camera down. It focuses heavily on micro expressions, shadows, and subtle environmental details. You also have access to Horror, Comedy, Western, and General, each tuning the color grading and movement style to match the requested mood.
Single Shot versus Multi Shot Timing
Timing is everything in filmmaking.
- Single Shot: You can generate a single continuous clip ranging from 3 seconds up to 12 seconds maximum. This is perfect for a long, slow establishing shot of a city.
- Multi Shot (Auto & Manual): This is where the platform becomes a true studio. You can generate up to 6 different shots in a single generation. They can range from 1 second up to 12 seconds. Using the manual mode, you can literally pace out an entire commercial. You can program a 2 second wide shot, followed by a 4 second close up, followed by a 3 second slow motion action shot.
Case Study 1: RUDRA The Awakening of Cosmic Destruction
To truly test the limits of Higgsfield Cinema Studio 2.0, I decided to build an IMAX grade cinematic trailer. I did not want a boring video about a person walking. I wanted cosmic level destruction. I wanted divine energy.
I created a 120 second architecture for a movie trailer titled “RUDRA.” You can watch the exact result of this workflow right here:
The Hollywood Camera Strategy
To achieve the $300 million blockbuster look, I ignored the default settings completely. I applied a strict visual rule to every single prompt in the sequence.
- Camera: Grand Format 70mm Film.
- Lens: Classic Anamorphic.
- Focal Length: 50mm.
- Aperture: f/1.4.
This specific combination guaranteed that every shot had a wide, epic frame. The 50mm focal length ensured Lord Shiva looked powerful and natural, without any GoPro style distortion on his face. The f/1.4 aperture melted the background storm clouds into a beautiful cinematic blur.
The Scene Construction
I followed a professional action rhythm. Silence to Tension to Escalation to Freeze to Release to Overpower to Collapse to Aftermath.
For the climax scene, I used the Custom Speed Ramp feature. I wanted to show Lord Shiva in his full Rudra Roop. The camera needed to orbit him while a storm raged. I programmed the speed curve specifically. From 0 to 3 seconds, the motion was normal. From 3 to 4 seconds, time suddenly stopped. From 4 to 9 seconds, the camera performed an ultra slow orbit around his frozen, glowing third eye.
This level of control is simply impossible on basic AI video platforms. By combining the Grand Format 70mm sensor with a Custom Speed Ramp, the resulting video looked like it was rendered by a massive VFX studio.
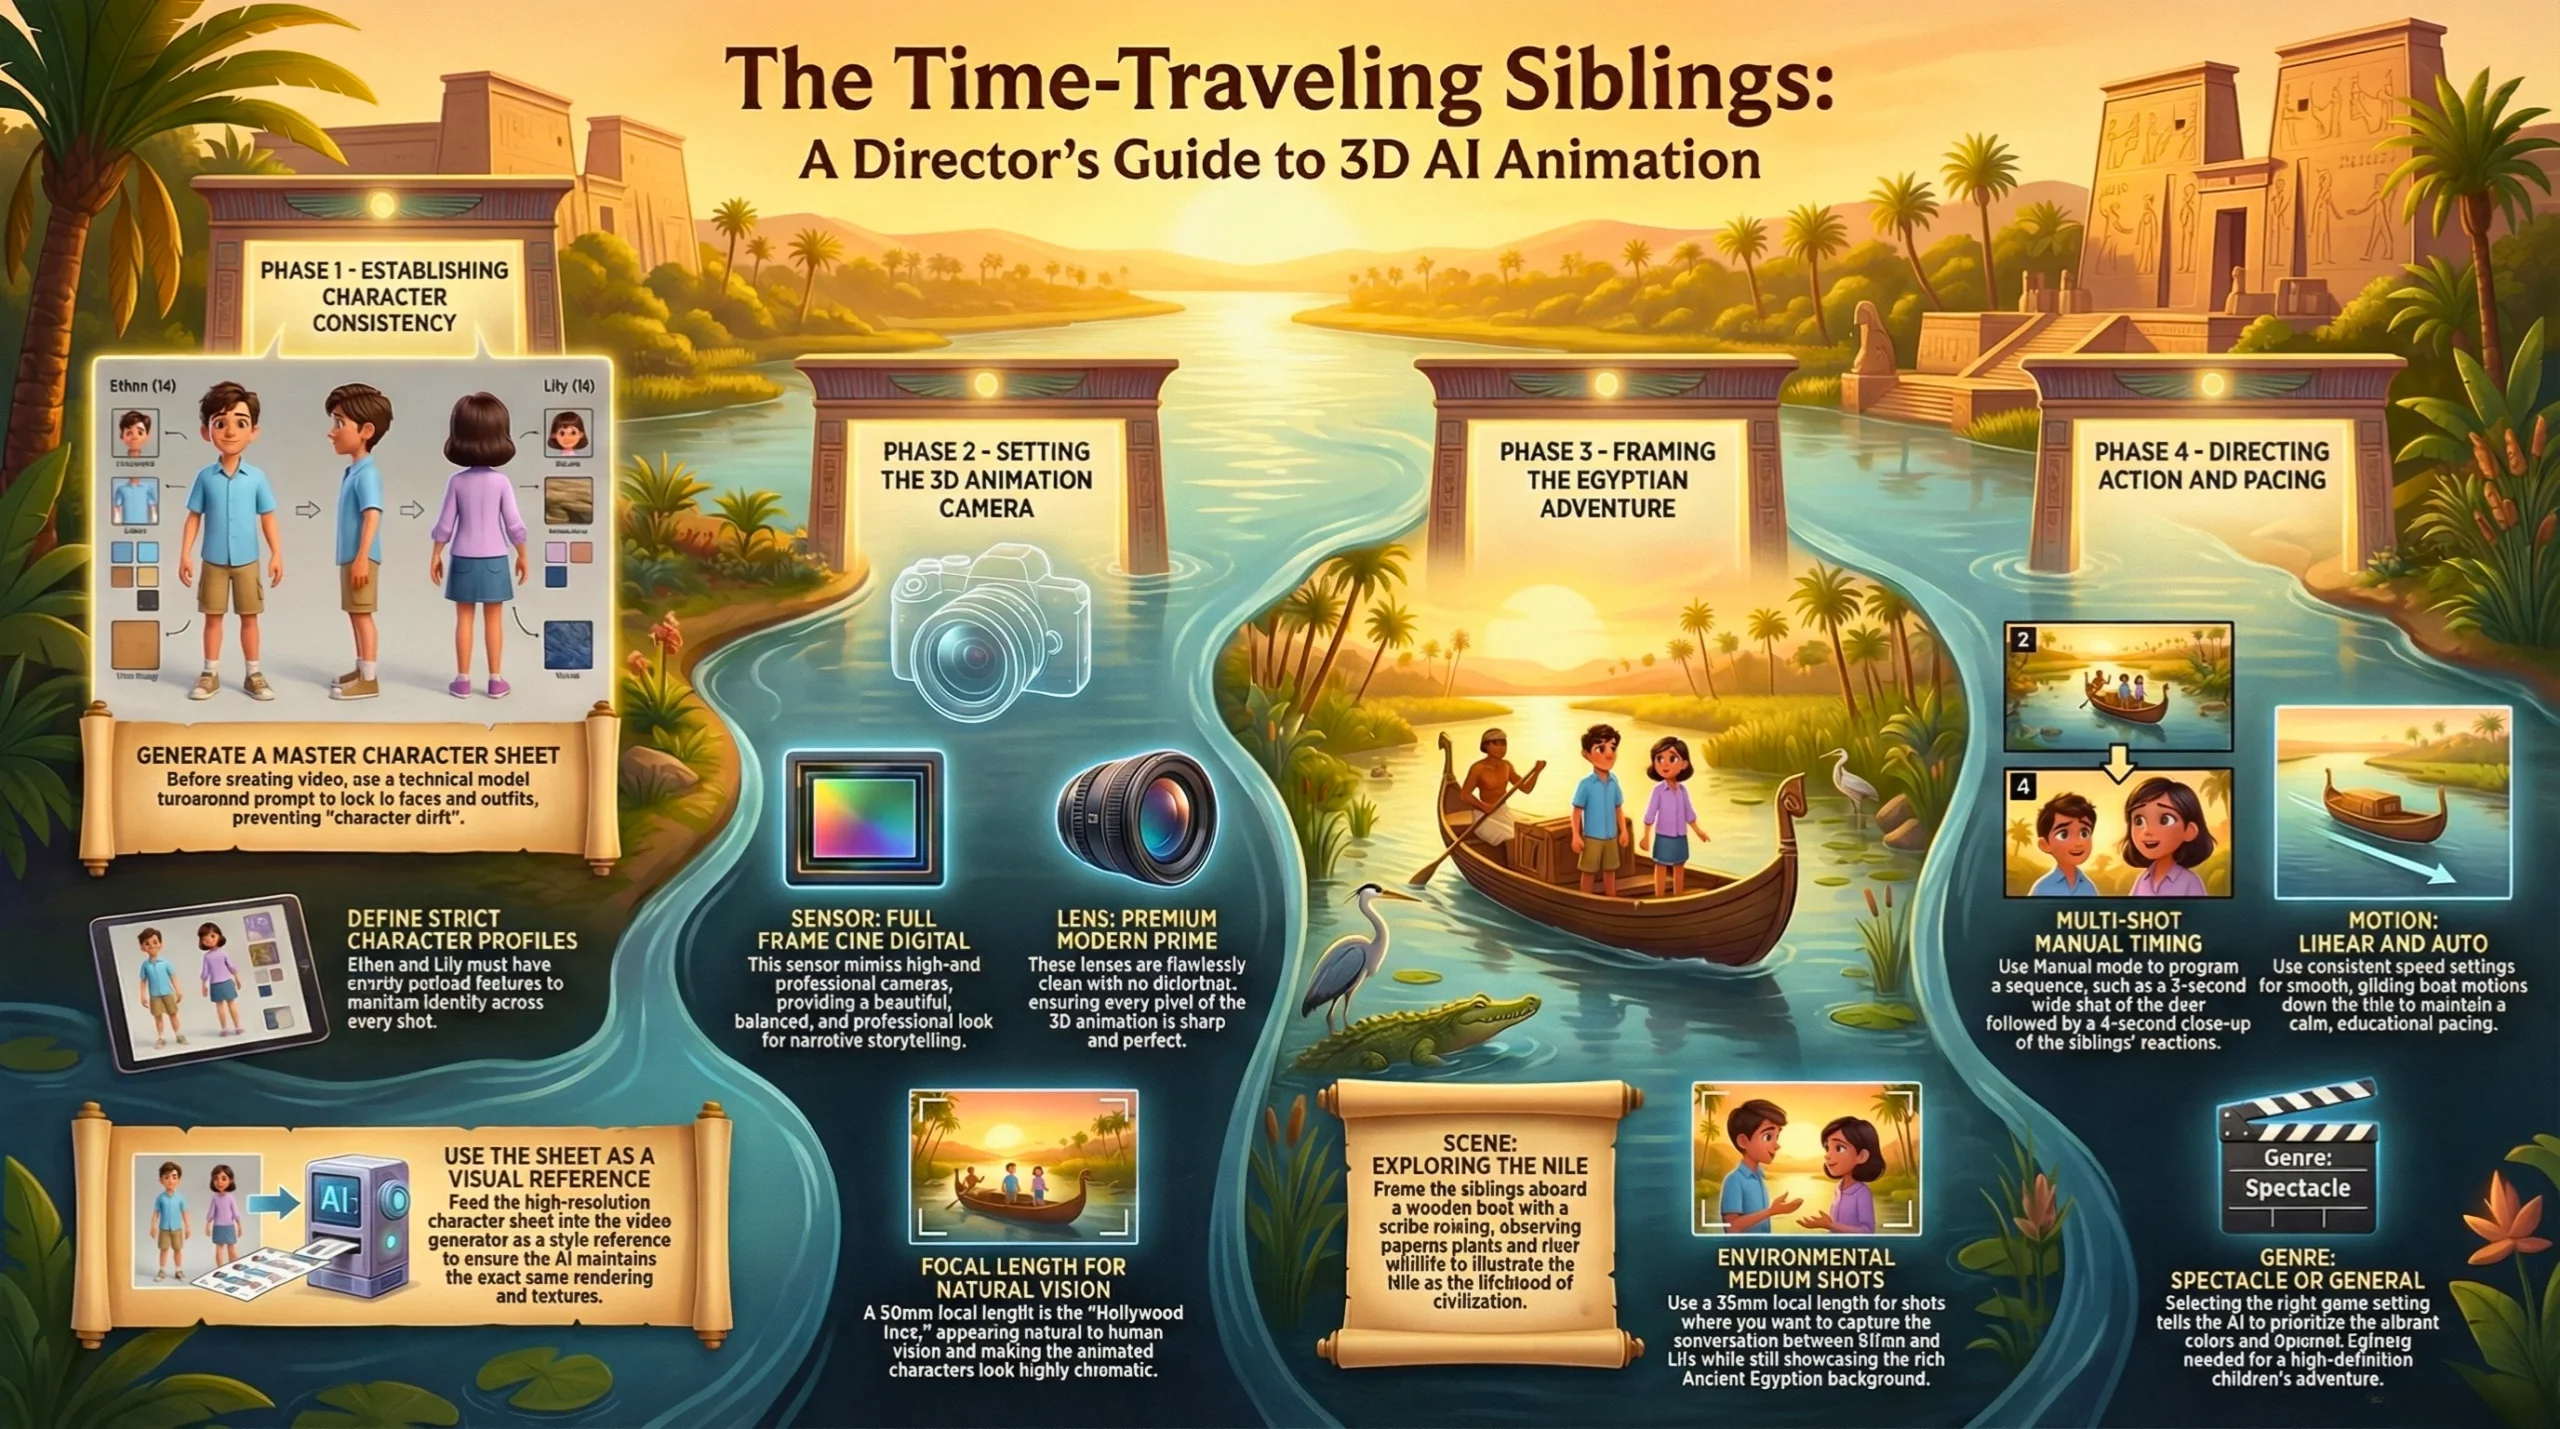
Case Study 2: The Time Traveling Siblings (3100 BC)
For my second major project, I completely pivoted the visual style. I wanted to test if Higgsfield Cinema Studio 2.0 could handle a stylized, 3D Pixar Animation aesthetic while maintaining strict narrative control.
I built an educational adventure series. The story featured two siblings, Ethan and Lily, traveling back to Ancient Egypt. You can watch the full animated adventure here:
The Character Consistency Challenge
Anyone who has used AI knows the pain of character drift. You ask for a boy in a blue shirt. In the very next shot, he suddenly has a red shirt and glasses. This ruins the story instantly.
To solve this, I developed a highly specific Character Profile system. Ethan was defined strictly: 14 years old, sky blue short sleeve shirt, khaki cargo shorts, chestnut brown messy bangs. Lily was defined equally strictly: 12 years old, lavender sleeveless blouse, navy blue denim skirt, golden blonde side swept bangs.
The Secret Weapon: The Character Sheet Prompt
Before I generated a single frame of video, I had to lock in their faces. I used a highly specialized text prompt to generate a master reference sheet for the AI to study.
If you are struggling with character consistency, copy and paste this exact prompt into your image generator first:
Prompt – Create a professional character reference sheet based strictly on the uploaded reference image. Use a clean, neutral plain background and present the sheet as a technical model turnaround while matching the exact visual style of the reference (same realism level, rendering approach, texture, color treatment, and overall aesthetic). Arrange the composition into two horizontal rows. Top row: four full body standing views placed side by side in this order: front view, left profile view (facing left), right profile view (facing right), back view. Bottom row: three highly detailed close up portraits aligned beneath the full body row in this order: front portrait, left profile portrait (facing left), right profile portrait (facing right). Maintain perfect identity consistency across every panel. Keep the subject in a relaxed A pose and with consistent scale and alignment between views, accurate anatomy, and clear silhouette; ensure even spacing and clean panel separation, with uniform framing and consistent head height across the full body lineup and consistent facial scale across the portraits. Lighting should be consistent across all panels (same direction, intensity, and softness), with natural, controlled shadows that preserve detail without dramatic mood shifts. Output a crisp, print ready reference sheet look, sharp details.
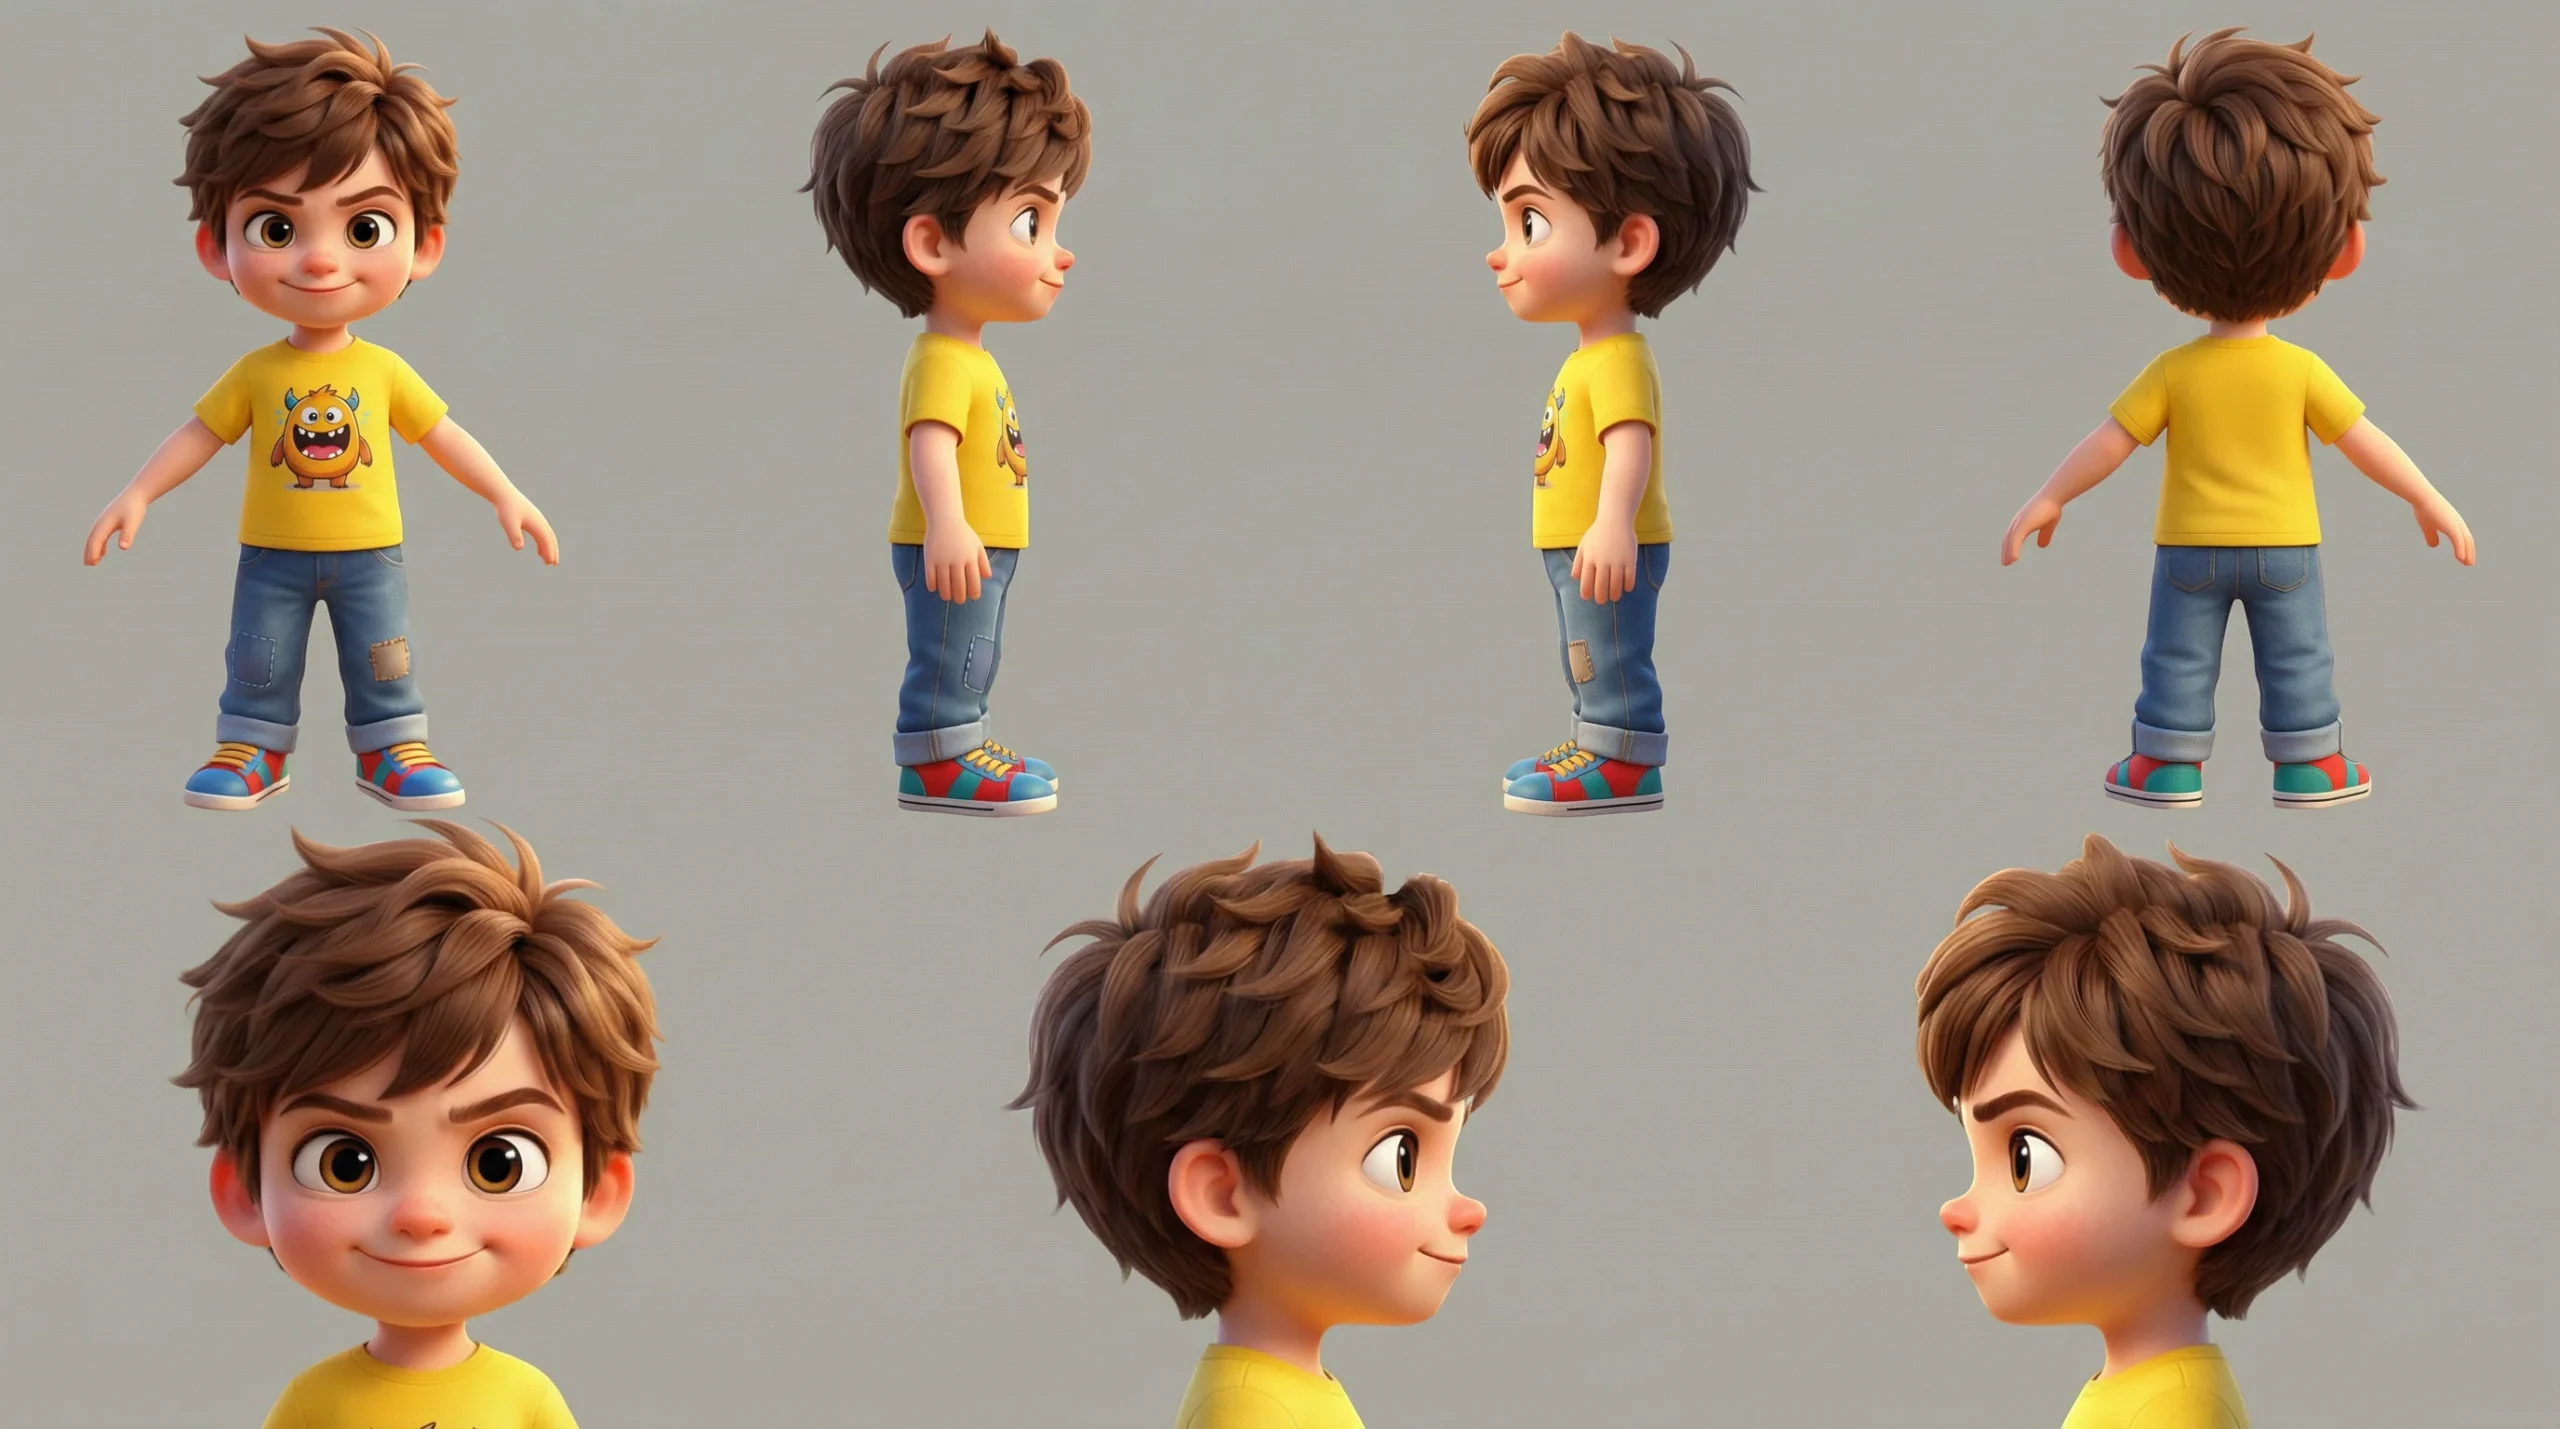
Once I had this sheet, I fed it into the video generator as a style reference. From that point forward, Ethan and Lily looked perfectly consistent, whether they were standing in front of a massive pyramid or looking at a glowing time machine in their attic.
For this project, I switched the camera settings. I used the Premium Modern Prime lens and the Full Frame Cine Digital camera. This removed the vintage film grain and provided the flawlessly clean, sharp pixels required for top tier 3D animation.
Pro Tip for Cinema Studio 2.0
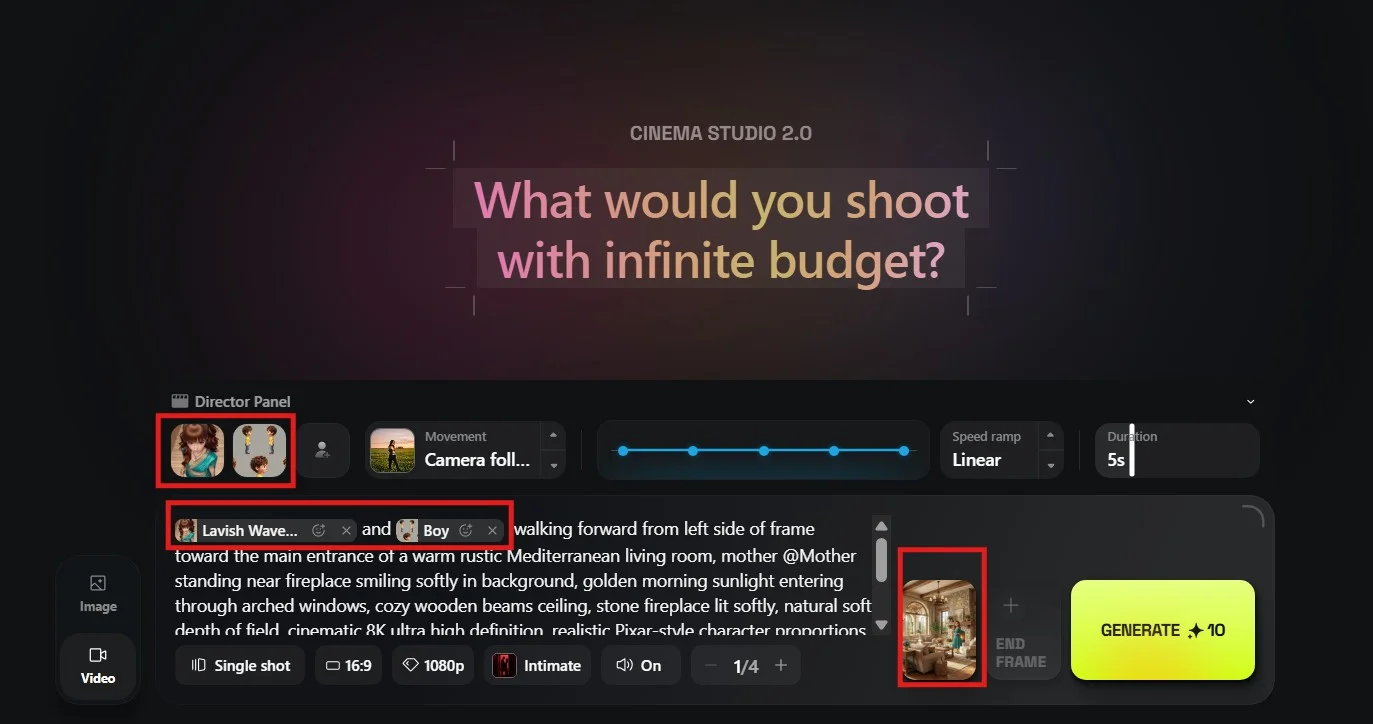
Always make sure you upload the Character’s reference sheet while using “@” in the prompt section from Directors Panel for character consistency. If you see in the below screenshot – I have used two 3D characters – A girl and a younger boy. The 3D girl character is made up of Soul ID Character (by submitting the 50 images including different angles). So it captured my 3D character perfectly and name shows – “Lavish Waves of Elegance”. If you see there is another character of “Mom” in the prompt. So you can select maximum 3 characters at a time in your prompt.
Apart from all the settings (like Camera Angle, Speed ramp, shot reference, ratio, resolution, genre, sound, batch size and duration in Cinema 2.0. There is one more important feature is “Start Frame” and “End Frame”. If the previous scene continues or using image to video option – make sure you use the Start Frame to animate the image for better results. (ref. below)
Monetization Guide: How to Earn Money with These Skills
This is the section where we switch from technical directing to business strategy. Higgsfield Cinema Studio 2.0 is an absolute production powerhouse. Because the output quality is so incredibly high, you can legitimately build a highly profitable business using this tool.
Idea 1: Commercial Client Services
Local businesses, tech startups, and e-commerce brands desperately need high quality video advertisements. Traditional video production costs thousands of dollars for a single day of shooting. You have to hire actors, rent cameras, and secure locations.
With this platform, your overhead cost is practically zero. You can offer a service where you generate 30 second, hyper realistic commercials for $500 to $1000. You can use the Extreme Macro lens to show highly detailed product textures. You can use the 8K Modular Digital camera to ensure the footage looks perfect on massive screens. Since you control the lighting and the camera angles, the final delivery looks like a premium agency production.
Idea 2: YouTube Automation and Social Media Growth
The attention economy rewards high quality visuals. If you want to grow a massive following on YouTube, Instagram, or TikTok, generic stock footage will no longer work.
You can create entirely new channels in highly profitable niches. You can build a channel focused on historical documentaries, using the Classic 16mm Film camera to generate realistic footage of ancient battles. You can build a channel focused on animated children’s stories, just like my Time Traveling Siblings project.
The high retention rates driven by these cinematic visuals translate directly into higher subscriber counts, more likes, and significantly higher ad revenue payouts.
Idea 3: Selling Digital Stock Assets
The demand for high end b-roll footage is massive. Video editors, documentary filmmakers, and marketing agencies constantly buy short video clips from sites like Shutterstock or Adobe Stock.
You can use the Multi Shot Auto feature in Higgsfield to generate hundreds of high quality clips efficiently. You can set the genre to Spectacle, the lens to Anamorphic, and generate stunning landscapes, futuristic cities, or abstract macro textures. You can package these clips into bundles and sell them directly to creators. You are essentially operating a virtual stock footage studio from your desk.
Read this article: Leonardo AI — Full Guide & Image Generation Models
Directing Your First Masterpiece
Building a great video requires patience. You cannot just type a few words and expect a miracle. You must treat the AI like a highly skilled, but very literal, camera crew.
Always start with your foundation. Pick your camera sensor. Choose your lens. Lock in your focal length. Once your virtual camera is built, focus on your lighting and your subject. Use the Speed Ramps to create emotional weight in your scenes.
If you are building a narrative story, take the extra time to generate a proper Character Sheet. Consistency is the primary difference between a professional director and an amateur prompt writer.
Do not be afraid to experiment. Try pushing the focal length to 14mm for an aggressive, uncomfortable close up. Try pushing the aperture to f/11 for a sweeping, detailed landscape. The virtual film set is entirely yours to control.
Frequently asked questions
Here are the most common questions about the Higgsfield Cinema Studio 2.0 workflow, optimized for your learning.
Does Higgsfield Cinema Studio 2.0 really replace traditional cameras?
For specific types of digital content, yes. While it cannot physically film a live event, it completely replaces the need for expensive b-roll shoots, massive CGI rendering farms, and expensive lens rentals for narrative storytelling.
What is the best camera setting for a Hollywood movie look?
Through extensive testing, the absolute best combination for a blockbuster look is the Grand Format 70mm Film camera, paired with a Classic Anamorphic lens, a 50mm focal length, and a wide f/1.4 aperture. This creates massive depth and beautiful background blur.
How do I stop the AI characters from changing faces in every shot?
You must use a strict character reference image. Generate a full character turnaround sheet showing the front, back, and profile of the face. Use this single, highly detailed sheet as the visual reference for every single shot in your sequence.
Can I use these generated videos for commercial client projects?
Yes. You can use the high resolution outputs to build commercials, music videos, and social media advertisements for paying clients. The visual fidelity of the 8K (4K Quality + Upscale the image with Topaz; built in Higgsfield) Digital camera setting is more than sufficient for professional broadcast.
How does the Multi-Shot manual feature actually work?
The manual multi shot feature allows you to program up to 6 consecutive shots in a single generation. You can manually assign the exact duration for each shot, ranging from 1 second up to 12 seconds. This allows you to effectively edit the pacing of a scene before you even render it.
The Final Takeaway
The era of typing basic text prompts is over. The era of the AI Director has arrived. The Higgsfield Cinema Studio 2.0 platform is an incredibly deep, highly rewarding tool for anyone willing to learn the craft of cinematography.
Stop accepting random, flat generations. Take control of the focal length. Command the lighting. Set the speed ramps. Your stories deserve to be told with IMAX level quality. Go open the studio, load up your 70mm film, and start directing.
Priyanshu Khatri Founder, SoulAI Writes
Read more articles

Higgsfield Cinema Studio 2.0: Are You Directing AI Movies?
Are You Still Making Basic AI Videos? How Higgsfield Cinema Studio 2.0 Builds Real Hollywood…
AI Book Writing Prompts: 4 Steps to a Best-Seller (2026)
AI Book Writing Prompts: Can You Write a Best-Seller in a Weekend? AI Book Writing…

AI Blog Writing Prompts: 7 Steps to Viral Content (2026)
The Ultimate AI Blog Writing Workflow: Are You Using the Right Prompts? AI Blog Writing…
Lullaby AI Story Generator Review: Turn Kids into Pixar Heroes?
Lullaby AI Story Generator: Can You Really Turn Your Child Into a Pixar Character? Imagine…
Inside the Moltbook AI Social Network: The Rise of the “Agent Internet” (2026 Review)
Moltbook AI Social Network: Are Your Agents Gossiping Behind Your Back? Imagine a world where…
Top Test Automation Tools 2026: Katalon, Applitools & ACCELQ Review
Top Test Automation Tools 2026: Katalon, Applitools & ACCELQ Review Top Test Automation Tools like…


Leave a Reply